How to Caramelize Onions Perfectly Every Single Time

This post covers the slow, rewarding process of caramelizing onions until they're jammy, sweet, and deeply golden. You'll learn why patience matters, which onions work best, and how to avoid the common mistakes that leave you with burnt rings or pale, steamed slices. Whether you're building a French onion soup or topping a burger, mastering this technique transforms ordinary alliums into something extraordinary.
What type of onion is best for caramelizing?
Yellow onions are the go-to choice for most cooks because they strike a perfect balance between sweetness and savory depth. They're widely available, affordable, and contain enough natural sugars to develop that coveted mahogany color without becoming cloying. That said, sweet varieties like Vidalia or Walla Walla can produce an even softer, almost jam-like result if you prefer a milder finish. Red onions work in a pinch, though they tend to hold onto a slight sharpness and won't reach the same depth of flavor as their yellow counterparts.
Here's the thing: the onion's water content matters just as much as its sugar. Fresh, firm bulbs—whether from a local farmers' market or a standard grocery chain like Trader Joe's—will release moisture evenly, preventing scorching in the first twenty minutes. Avoid onions with soft spots or sprouting green shoots; they're past their prime and can turn bitter when exposed to prolonged heat. In commercial kitchens, prep cooks often reach for generic yellow sacks from Restaurant Depot, but at home, any recently harvested allium will outperform a months-old supermarket relic.
Size matters too. Larger onions are easier to slice evenly and tend to have a better sugar-to-sulfur ratio than tiny pearl onions or cocktail cipollini. If you're cooking for a crowd, buy the biggest yellow onions you can find. One extra-large onion yields roughly one cup of finished caramelized onions—enough to top four burgers or fill one large tart.
| Onion Type | Sugar Content | Final Flavor | Best Use |
|---|---|---|---|
| Yellow | Moderate | Savory-sweet, complex | French onion soup, tarts |
| Sweet (Vidalia/Walla Walla) | High | Candy-like, mild | Burgers, pizza |
| Red | Low | Tangy, slightly sweet | Toppings for salads or tacos |
Why does it take so long to caramelize onions?
The process demands time because you're coaxing complex sugars out of raw alliums through the Maillard reaction and true caramelization—a chemical transformation that simply can't be rushed. When sliced onions hit a hot pan, they first release a flood of water. That liquid has to evaporate before the temperature can climb high enough to brown the sugars. Depending on the batch size, this initial sweating phase can last fifteen to twenty minutes alone.
Onions have been cultivated for over five thousand years, and the slow-cooking method likely originated in medieval Europe, where peasant cooks learned that patience could transform the cheapest staples into something luxurious. Today, the chemistry remains unchanged. During the first phase, the heat breaks down the onion's cell walls, releasing sulfur compounds that sting your eyes. As the moisture evaporates, those sulfurous notes dissipate, making room for the sweeter aromas to dominate. By the thirty-minute mark, the Maillard reaction kicks in—amino acids and reducing sugars interact to create hundreds of new flavor compounds. True caramelization follows, breaking sucrose and fructose into smaller molecules that taste nutty, bitter-sweet, and deeply savory all at once.
Worth noting: the difference between golden and truly deep brown onions can be a full forty-five minutes. Some recipes promise shortcuts, but as Serious Eats has thoroughly documented, there's no legitimate way to compress a proper caramelization into five minutes without sacrificing texture or introducing bitter, burnt notes. The catch? Most home cooks pull the onions too early, stopping at the blonde stage when they should keep going until the mass has reduced by roughly three-quarters.
The science is straightforward: as Cook's Illustrated has demonstrated, onions must shed roughly 75 percent of their moisture before true browning can begin. A heavy-bottomed pan helps. A Le Creuset enameled Dutch oven or a Lodge 12-inch cast-iron skillet distributes heat evenly, preventing hot spots that would otherwise char one section while another remains raw. Low, steady heat—medium-low to low—is the only setting that allows the onions to collapse slowly into a cohesive, sweet tangle.
What's the difference between caramelized and sautéed onions?
Sautéed onions are cooked quickly over high heat until translucent and slightly browned at the edges; caramelized onions are cooked slowly over low heat until they collapse into a sweet, mahogany paste. The two techniques serve entirely different purposes in the kitchen. A sautéed onion adds crunch and aromatic bite to a stir-fry or fajita. A caramelized onion melts into the background of a dish, lending a savory-sweet base that tastes like it simmered for hours.
Visually, the contrast is stark. Sautéed onions retain their shape and some snap; caramelized ones look like a dark, glossy compote. The flavor gap is even wider. Where sautéed alliums still carry a sulfurous punch, fully caramelized onions have traded that sharpness for molasses-like depth. You wouldn't swap one for the other in a recipe without changing the final character of the dish.
How do you caramelize onions perfectly on the stove?
Start by slicing the onions uniformly—about an eighth of an inch thick—so they cook at the same rate. A sharp chef's knife (the Wüsthof Classic 8-inch is a workhorse many professionals trust) makes quick work of a five-pound bag without bruising the cell walls. Bruised onions weep unevenly and can turn mushy before they brown.
Slice from pole to pole (through the root and stem ends) rather than across the equator. Pole-to-pole slices hold their shape better and produce longer, silkier strands that drape beautifully over a pizza or nestle into a sandwich. Crosswise rings tend to fall apart into slippery half-moons that don't have the same luxurious texture.
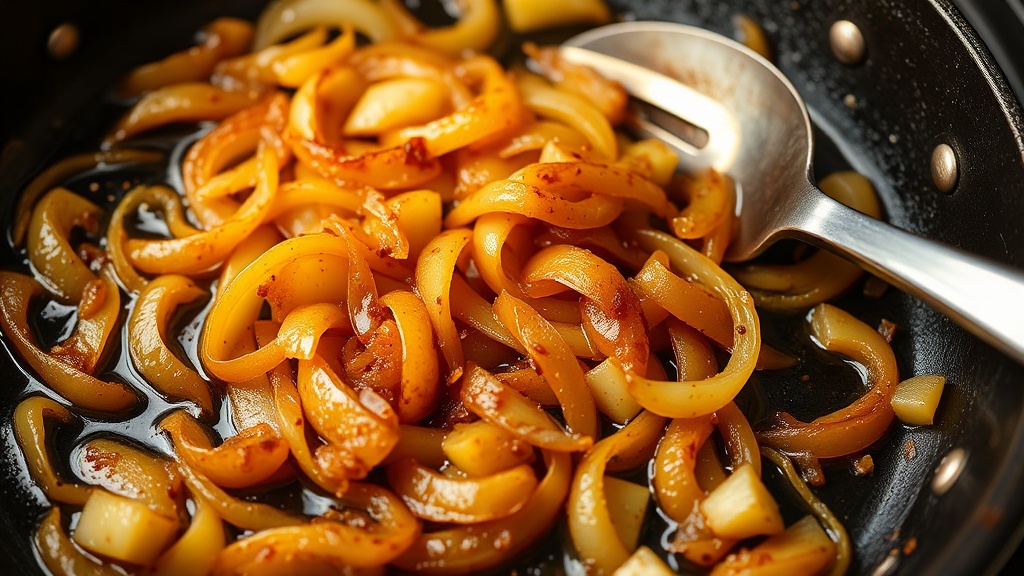
Heat a tablespoon of butter and a tablespoon of neutral oil (vegetable or grapeseed) in your heavy pan over medium-low heat. The oil raises the smoke point; the butter adds flavor. Once the fat shimmers, add the onions and a generous pinch of salt. The salt draws out moisture, jump-starting the sweating phase. Stir every few minutes, scraping the fond—the sticky brown bits that collect on the pan bottom—back into the onions. That's where much of the flavor lives.
After twenty minutes, the onions will be soft and blonde. This is where most recipes fail you by declaring the job done. Keep going. Reduce the heat to low. If the fond starts to blacken, deglaze with a splash of water, dry white wine, or even a little balsamic vinegar. The liquid lifts the browned bits and reintroduces them as flavor. Stir. Wait. Repeat. The total time from raw to deeply caramelized should fall between forty-five minutes and one hour for three to four sliced onions. You'll know they're finished when the pan looks almost empty and the onions have reduced to a glossy, deep-brown jam.
Here's the thing: adding a pinch of baking soda can speed things up slightly by raising the pH and accelerating the Maillard reaction. But use no more than an eighth of a teaspoon per pound of onions, or you'll end up with an unpleasantly soft, almost puréed texture. For purists, salt, fat, and time are the only necessary ingredients.
Can you speed up caramelized onions?
Yes, though every shortcut involves a trade-off. The most reliable method is to increase the surface area by slicing the onions thinner or using a wider pan so moisture evaporates faster. Some cooks swear by adding a little sugar at the start, but this mimics caramelization rather than achieving it naturally; the result is sweeter but lacks the complex, savory backbone of the real thing.
The microwave offers another dubious shortcut: some cooks nuke sliced onions with butter for ten minutes before finishing them in a skillet. The result is edible, but the texture is closer to stewed than caramelized, and the flavor lacks the toasted depth that only dry heat can provide. Worth noting: if you're truly pressed for time, a high-quality jarred caramelized onion compote from a brand like Stonewall Kitchen is a better substitute than a rushed homemade batch.
Pressure cookers and slow cookers both claim to solve the time problem, yet neither delivers the exact texture and color of the stovetop method. The Instant Pot, for example, can produce soft, brown onions in about twenty minutes under pressure, but they tend to be wetter and benefit from a final ten-minute sauté in a skillet to drive off excess liquid. As Bon Appétit notes, the stovetop remains the gold standard for control and consistency.
How do you store and use caramelized onions?
Caramelized onions keep beautifully in the refrigerator for up to five days and freeze well for up to three months. Store them in a glass container (a Pyrex round with a tight lid works perfectly) so they don't absorb off-flavors from plastic or neighboring garlic. When freezing, portion them into ice-cube trays for easy retrieval—one cube equals roughly two tablespoons. Once frozen solid, transfer the cubes to a freezer bag to prevent freezer burn.
Beyond the obvious applications, try stirring caramelized onions into creamy mashed potatoes, blending them into a compound butter for steak, or folding them into biscuit dough before baking. They also make an unforgettable base for flatbread topped with fresh figs and prosciutto, or a rich addition to a grilled cheese made with sourdough and sharp cheddar. Pile them high on a Shake Shack-style cheeseburger, fold them into an omelet with Gruyère, or spread them over puff pastry for a quick onion tart.
Once a batch is cooling in the fridge, the hardest part is deciding where to use it first.